# Type at least 1 character to search # Hit enter to search or ESC to close
Cart
# Type at least 1 character to search # Hit enter to search or ESC to close


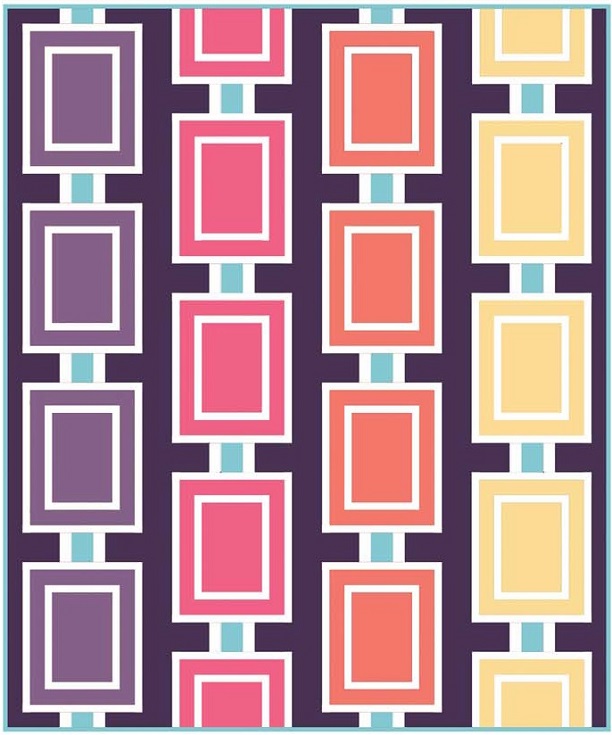
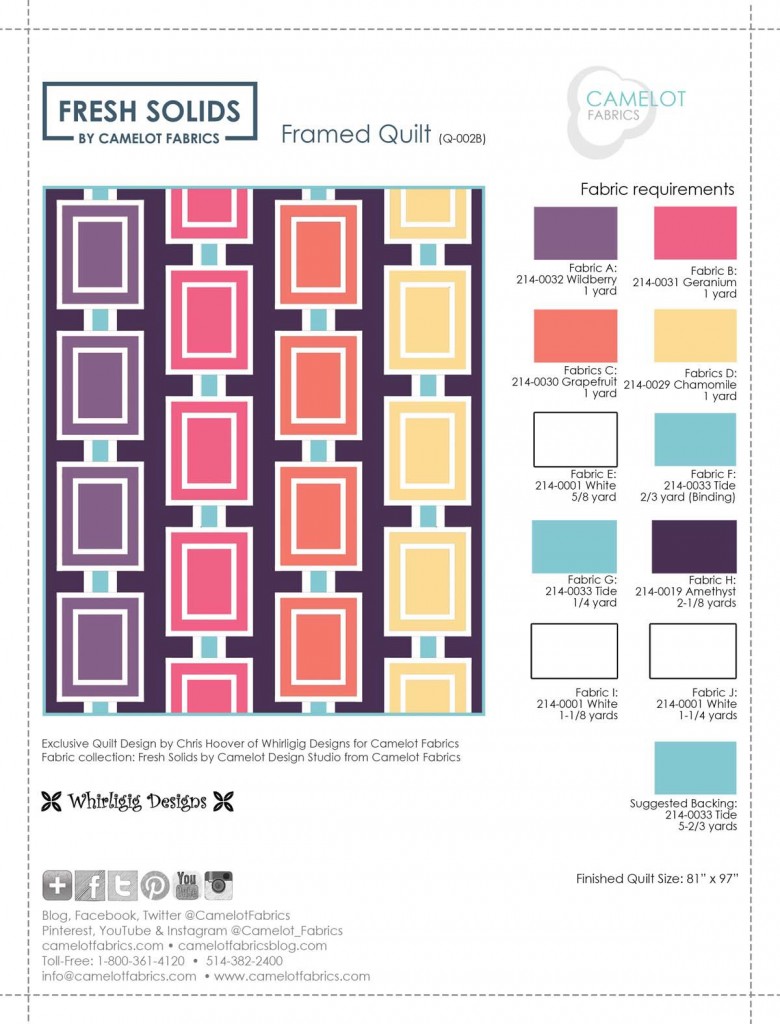
Today we are featuring our Framed Quilt, designed by Chris Hoover of Whirligig Designs Framed is a fun and modern quilt design, consisting of connected “frames” in vertical lines. This quilt does not have a border, so it has a cool look of the frame repetitions continuing off the quilt. You can have a lot of creative fun with this one. We chose to feature our sunset-inspired Fresh Solid colors, with a line of Wildberry, Geranium, Grapefruit, and Chamomile. To add a pop, we chose our Tide and Amethyst colors for the background. We love how our Solids Framed quilt looks like modern art!
Want to make your own Framed Quilt? See below.
FRAMED QUILT
Quilt Designed By: Chris Hoover of Whirligig Designs
Collection Featured: Fresh Solids by Camelot Design Studio
OTHER TOOLS & SUPPLIES
– Rotary cutter & mat
– Sewing machine & coordinating thread
– Iron & pressing surface
– Pencil
– 3 yards extra-wide quilt batting (at least 86” wide)
NOTES:
• Please wash, dry & iron your fabric before beginning, and trim selvages.
• For best results, read all directions before beginning.
• Use an accurate ¼” seam allowance for all sewing.
• WOF = width of fabric.
CUTTING
Focus Prints – Fabrics A & C:
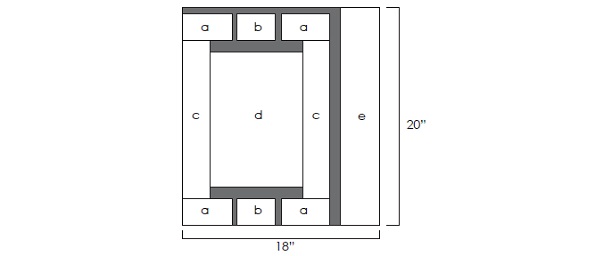
From each of these 2 fabrics, cut the following as shown in the diagram at right:
• 16 – 2 ½” x 4 ½” rectangles (a), 8 – 2 ½” x 3 ½” rectangles (b), 8 – 2 ½” x 14 ½” rectangles (c), and 4 – 8 ½” x 12 ½” rectangles (d) for full blocks.
• 4 – 2 ½” x 20” rectangles (e). Set aside for backing.
Focus Prints – Fabrics B & D:
From each of these 2 fabrics, cut the following as shown in the diagram at right:
• 12 – 2 ½” x 4 ½” rectangles (a), 6 – 2 ½” x 3 ½” rectangles (b), 6 – 2 ½” x 14 ½” rectangles (c, and (3) 8 ½” x 12 ½” rectangles (d) for full blocks.
• 3 – 2 ½” x 20” rectangles (e). Set aside for backing.
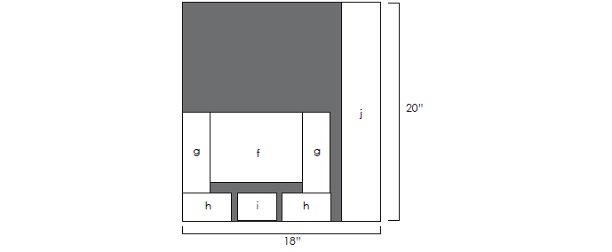
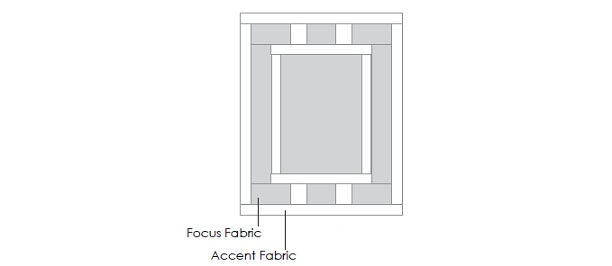
Additionally, cut the following from B & D as shown in the diagram at left:
• 2 – 6 ½” x 8 ½” rectangles (F), 4 – 2 ½” x 7 ½” rectangles (g), 4 – 2 ½” x 4 ½” rectangles (h), and 2 – 2 ½” x 3 ½” rectangles (i) for half blocks.
• 2 – 2 ½” x 20” rectangles (j). Set aside for backing.
Fabric E:
Cut 2 – 4 ½” strips WOF. From strips, cut:
• 28 – 2” x 4 ½” rectangles for sashing blocks.
Cut 4 – 2 ½” strips WOF. From strips, cut:
• 72 – 2” x 2 ½” rectangles for blocks and sashing blocks.
Fabric F (Binding):
Cut 9 – 2 ¼” strips WOF for binding.
Fabric H:
Cut 4 – 5 ½” strips WOF. From strips, cut:
• 28 – 5 ½” x 4 ½” rectangles and 8 – 5 ½” x 2 ½” rectangles for sashing blocks.
Cut 8 – 4 ½” strips WOF for sashing strips.
Cut 5 – 2 ½” strips WOF for sashing strips.
Fabric I:
Cut 24 – 1 ½” strips WOF. From strips, cut:
• 12 – 1 ½” x 18 ½” rectangles, 16 – 1 ½” x 16 ½” rectangles, 12 – 1 ½” x 12 ½” rectangles,
16 – 1 ½” x 10 ½” rectangles, 8 – 1 ½” x 9 ½” rectangles and 8 – 1 ½” x 6 ½” rectangles.
Fabric J:
Cut 26 – 1 ½” strips WOF. From strips, cut:
• 16 – 1 ½” x 18 ½” rectangles, 16 – 1 ½” x 16 ½” rectangles, 16 – 1 ½” x 12 ½” rectangles and
16 – 1 ½” x 10 ½” rectangles.
Fabric G:
Cut 2 – 3 ½” strips WOF. From strips, cut:
• 14 – 3 ½” x 4 ½” rectangles and 4 – 2 ½” x 3 ½” rectangles for sashing blocks.
Backing:
Cut (2) 42” x 102” rectangles.

PIECING
Full Blocks
Each full block is made using one focus fabric, an accent fabric (either Fabric I or Fabric J) and 2” x 2 ½” Fabric E rectangles. Follow the instructions below to make 14 blocks in the combinations shown in the chart.

Sew a 1 ½” x 12 ½” accent rectangle to the sides of a 8 ½” x 12 ½” focus rectangle. Sew a 1 ½” x 10 ½” accent rectangle to the top and bottom of the focus rectangle to make Unit 1.

Sew a 2 ½” x 14 ½” focus rectangle to each side of Unit 1.

Sew 2 – 2 ½” x 4 ½” and 1 – 2 ½” x 3 ½” focus rectangles together with 2 – 2” x 2 ½” Fabric E rectangles as shown. Make 2 of these units and sew them to the top & bottom of Unit 1.

Half Blocks
Each full block is made using one focus fabric, accent Fabric J and 2” x 2 ½” Fabric E rectangles. Follow the instructions below to make 4 blocks in the combinations shown in the chart.


Sew a 1 ½” x 6 ½” accent rectangle to the sides of a 6 ½” x 8½” focus rectangle. Sew a 1 ½” x 10 ½” accent rectangle to the bottom of the focus rectangle to make Unit 2.

Sew a 2 ½” x 7 ½” focus rectangle to each side of Unit 2.

Sew 2 – 2 ½” x 4 ½” and 1 – 2 ½” x 3 ½” focus rectangles together with 2 – 2” x 2 ½” Fabric I rectangles as shown and sew them to the bottom of Unit 2.

Sew a 1 ½” x 9 ½” accent rectangle to the sides of Unit 2. Sew a 1 ½” x 16 ½” accent rectangle to the bottom of Unit 2. Unfinished Half Block size is 16 ½” x 10 ½”.

Sashing Blocks & Strips
Sew 2 – 5 ½” x 4 ½” Fabric H rectangles, 2 – 2” x 4 ½” Fabric E rectangles and a 3 ½” x 4 ½” Fabric G rectangle together as shown to make Unit 3. These units will be inserted between blocks (see cover page). Make 14.

Sew 2 – 5 ½” x 2 ½” Fabric H rectangles, 2 – 2” x 2 ½” Fabric E rectangles and a 3 ½” x 2 ½” Fabric G rectangle together as shown to make Unit 4. These units will be inserted between Full Blocks and the top & bottom edges of the quilt (see cover page). Make 4.

ASSEMBLY
• Arrange full blocks, half blocks and Units 3 and 4 in columns as shown on the front page of the tutorial. Sew the columns of blocks and units together.
• Sew the short ends of 4 ½” Fabric E strips together. Cut 3 sashing strips to 4 ½” x 96 ½”. Sew a sashing strip between the columns of blocks.
• Sew the short ends of 2 ½” Fabric E strips together. Cut 2 sashing strips to 2 ½” x 96 ½”. Sew a sashing strip to each outer side.

PIECING THE BACK
• Cut Backing fabric into two equal lengths (approximately 102”).
• Sew 3” x 20” focus rectangles (set aside for backing) together as shown, in whichever order you please. Subcut strip set into 3 – 6 ½” segments and sew together end to end. Trim length to match backing fabric length.
• Sew pieced section between two Backing pieces for a fun back!
• Layer quilt top with batting and backing. Baste and quilt as desired, and bind with 2 ¼” Fabric F strips.

Hope you’ve had fun with us today! If you decide to try our Framed Quilt, we’d love to see. You can send your project photos to us at info@camelotfabrics.com or tag us on Instagram. Have a fantastic day!