# Type at least 1 character to search # Hit enter to search or ESC to close
Cart
# Type at least 1 character to search # Hit enter to search or ESC to close

 In this mini tutorial we used 2140503 #1, Yellow & Gray Hexagons, from The Design Studio Collection.[/caption]
Let's get to work! Click to see the tutorial after the jump.
2 - How To Sew an Invisible Hem
This simple stitch is an easy and effective way to give a garment a clean, professional-looking finish. It works best on woven fabrics of middling or heavy weight such as quilting cottons.
Supplies:
- Garment to be hemmed
- Needle & coordinating thread
- Scissors
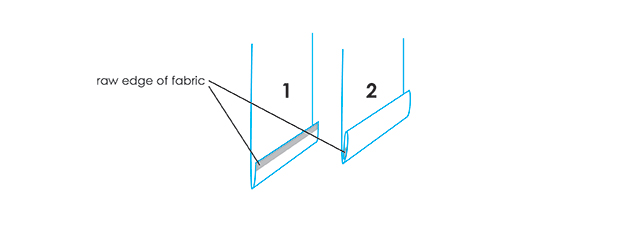
1. Before pinning up the hem, you can prepare the raw edge by serging it or edge-stitching with a zigzag stitch, or you can leave it raw. If you stitched along the edge, pin it up on the Wrong Side of the garment. if you left the edge bare, you'll fold it over on itself as shown before pinning, also against the Wrong Side of the garment. If you're hemming jeans, trim off the existing hem before beginning to avoid excess bulkiness.
In this mini tutorial we used 2140503 #1, Yellow & Gray Hexagons, from The Design Studio Collection.[/caption]
Let's get to work! Click to see the tutorial after the jump.
2 - How To Sew an Invisible Hem
This simple stitch is an easy and effective way to give a garment a clean, professional-looking finish. It works best on woven fabrics of middling or heavy weight such as quilting cottons.
Supplies:
- Garment to be hemmed
- Needle & coordinating thread
- Scissors
1. Before pinning up the hem, you can prepare the raw edge by serging it or edge-stitching with a zigzag stitch, or you can leave it raw. If you stitched along the edge, pin it up on the Wrong Side of the garment. if you left the edge bare, you'll fold it over on itself as shown before pinning, also against the Wrong Side of the garment. If you're hemming jeans, trim off the existing hem before beginning to avoid excess bulkiness.
 2. Feed your threaded needle through the hem allowance to anchor your thread, then pick up a couple of threads from the skirt or pant just above the edge of your hem as shown. If the cloth is very delicate or you notice any pulling, you'll want to pick up a few extra threads.
 3. Slip your needle under the fold of the hem and loop the stitch through the hem fabric, then pick up a couple of threads as you did in Step 2 to finish your second stitch. These stitches will be larger and more widely spaced than those of your usual hand seam: about 1/8" - 1/4" tall and 1/4" - 3/8" wide.
4. Continue stitching around the full length of your hem, then tie off your thread in the hem allowance. It's that simple!
We hope you've enjoyed our two mini tutorials in today's post! If you loved the sneak peak of the skirt in this tutorial, be sure to stay tuned for an upcoming How To's Day. *wink, wink*
Have a wonderful, restful day!
Happy Sewing!
3. Slip your needle under the fold of the hem and loop the stitch through the hem fabric, then pick up a couple of threads as you did in Step 2 to finish your second stitch. These stitches will be larger and more widely spaced than those of your usual hand seam: about 1/8" - 1/4" tall and 1/4" - 3/8" wide.
4. Continue stitching around the full length of your hem, then tie off your thread in the hem allowance. It's that simple!
We hope you've enjoyed our two mini tutorials in today's post! If you loved the sneak peak of the skirt in this tutorial, be sure to stay tuned for an upcoming How To's Day. *wink, wink*
Have a wonderful, restful day!
Happy Sewing!